Cajon Pass Chase Map
An Affinity for Maps
I have always had a huge interest in maps for as far back as I can remember. In all of my pursuits over the years, maps were either a necessary tool to accomplish the task at hand or an adjunct to augment the experience. As a child I had a massive aeronautical chart of Los Angeles hanging on my wall and I would study it for hours. Through that exercise I garnered an appreciation for distance and topography, as well as infrastructure and the historical aspects of the places listed before me. Soon maps became part of me and I would seek out and go to map stores like some kids would go to record stores or arcades.
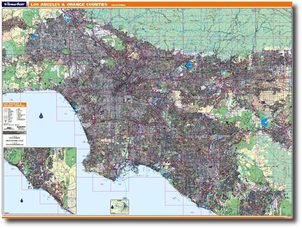 Today’s version of the Thomas Bros. Wall Map of LA and Orange Counties.Over the years I used everything from aeronautical charts, which were relatively cheap and accessible, to USGS topographical quads which were ideal but hard to get and very pricey for a teen earning but $1 a week allowance. As I grew older and made more money, (I have been working full-time since I was fifteen), I was able to afford better maps. Eventually I was able to hang on my wall the crème de la crème of maps — the Thomas Bros. Wall Map of Los Angeles and Orange Counties. I used it while listening to the local police and fire agencies on my scanner to track incidents and the like — I was the envy of all map nerds no doubt.
Birth of the Chase Map
As is the case the with all of you, I suspect, my life is now intertwined with maps on a daily basis, thanks in large part to the advent of GPS and the adoption of consumer-oriented maps from companies such as MapQuest and Google. I couldn’t be happier — or so I thought.
As far as rail activities are concerned, the consumer-grade mapping efforts leave a lot to be desired. The railroad representations tend to be very generalized and lack detail and, in most cases, accuracy. Obviously there is also a lack of rail-specific data pertinent to the “chase,” if you will. In most cases you can’t tell the difference between a well-traveled rail line from one that sees only seasonal traffic, or even one that may have been removed years ago. I have made attempts to offer more rail-centric content or disclose more reliable sources in the past. Despite the apparent convenience, one can’t rely solely on these consumer-grade maps, particularly when you are researching a new line that you are unfamiliar with.
I learned through the years to research lines that I intended to shoot from a variety of sources and ultimately developed techniques and skills to cull that data into a very detailed map specifically created for me. To wit, below are two examples of my work that I created for our trip to shoot BNSF’s Seligman Subdivision back in April of 2011. The first one contains an overview map and all the locations, addresses and phone numbers of key points along our route. Also included are a copious amount of radio frequencies for various local, state, and federal agencies along the way so I know what is going on wherever we might be. The second map shows a more detailed railroad map with topographical detail because it is what I used to navigate the unfamiliar terrain of the Kaibab National Forest through which the Seligman Sub runs. (Click on each image for a larger view in a new window.)
;) Our “Planning Map” showing key locations and address info, radio frequencies, and our tentative schedule and plan that we used for our Seligman Subdivision trip in April of 2011.
Our “Planning Map” showing key locations and address info, radio frequencies, and our tentative schedule and plan that we used for our Seligman Subdivision trip in April of 2011.
;) BNSF’s Crookton Cut-Off - A detailed map I made complete with control point locations, milepost markers, and potential access points.
BNSF’s Crookton Cut-Off - A detailed map I made complete with control point locations, milepost markers, and potential access points.
As the title element of the second map shows, this is the point that I referred to these maps as a “chase map.” So how did we avail ourself of the content of these maps whilst on the road? Through the use of an iPad, of course! In a post regarding the planning of the Seligman Trip, I explained the method:
PDF Maps iOS App | Avenza Systems IncThe beauty of this mapping solution was that I now had a custom map that held all of the information in one location and could be quickly referred to using one of our iPads. To accomplish that I exported the maps as Adobe PDF files and transferred them to the iPad. I quickly found out that the native iBooks application was rather slow at rendering the large files. I searched for a solution and found a great application from Avenza Systems, Inc. called, appropriately enough, “PDF Maps.” This application pre-renders the maps, which increases their storage size on your device, but the trade-off is lightning fast rendering of the maps. Perfect, just what I wanted. Oh, did I mention that it is also free?
This solution worked extremely well for us during the trip and I quickly fell in love with PDF Maps. It soon became the staple of my mapping applications and I loaded it to the gills with all the maps I wanted and/or created.
Coming Up Short
Soon I discovered that there was a shortcoming to my chase maps. The net effect of my solution was an electronic version of a paper map — not a mapping solution, per se. This was fine with me but not everyone is proficient at reading maps and discerning their present location.
In fact, I learned that most had little interest in learning to read maps because their telephone has a map that shows them right where there are. That was a very good point. This solution wasn’t fully leveraging all of the capabilities of most devices today which tend to be GPS-capable.
Now this is not to say that PDF Maps doesn’t support GPS technology, it does and does it very well. The problem lies in the fact that MY maps weren’t GPS-enabled, or more accurately georeferenced, so the PDF Maps app couldn’t show me where I was on my maps.
In Search of a Solution or “HOW MUCH is that Doggy in the Window?”
I began to research how I could convert my .PDF Chase Maps to a georeferenced .PDF file (or georeferenced .TIF file as well) which is what I needed. It turns out that is SO much easier said than done.
There are quite a few mapping applications available that will export content to a georeferenced .PDF or a GeoPDF® file. However, these applications tend to be high-end, enterprise-centric and, thusly, cost an insane amount of money — well outside of the budget of THIS one-man shop to say the least. In some cases, I am talking thousands of dollars.
Since our Arizona trip of April, 2011, I have been a “man-on-a-mission,” trying to find a viable and affordable solution to making my Chase Maps the best they can be. In light of my research and findings, I began to feel like “David vs. Goliath.”
Trials and Errors and Esri, Oh My!
Thanks to the bountiful amount of information accessible on the internet, I learned of almost all of the players in the Geospatial Information Systems (GIS) space and so began the long process of trial and error with their various programs and offerings. That effort began to feel like I was trying to find my way out of a housing tract and each road that I ventured down, while looking promising, ultimately was a cul-de-sac and did not lead me home. (I can’t even count the number of iterations of the Cajon Pass Chase Map that I have made with various products.)
![]() Eventually my attention turned to the variety of products offer by a company called Esri, (pronounced as a word, ‘ez-ree’). Esri is one of the largest, if not the largest, providers GIS products and data. Their flagship product is called ArcGIS and it is a comprehensive suite of applications.
Eventually my attention turned to the variety of products offer by a company called Esri, (pronounced as a word, ‘ez-ree’). Esri is one of the largest, if not the largest, providers GIS products and data. Their flagship product is called ArcGIS and it is a comprehensive suite of applications.
Esri produces one application in particular that peaked my interest, ArcGIS App for Smartphones and Tablets. Esri describes the ArcGIS App as a product that “lets you navigate maps, collect and report data, and perform GIS analysis. It is a part of the ArcGIS system and is a great way to
- Discover content by browsing map galleries from ArcGIS Online or leverage services from your existing enterprise GIS.
- Display maps and capture information.
- Develop a custom application or brand your own application specific to your business needs.
- Extend your GIS to a wider audience.”
“Hmm, interesting,” I thought. I began to evaluate the opportunities that this app brought to the table. I would have to most likely rebuild my map, yet again. “Like I haven’t done that a dozen times already!”, I reasoned.
If Things Aren’t Working, Change Your Approach
At this point I began to reassess my approach to making a map that I could be proud of. Instead of having my map and trying to find something that would allow me to geo-encode it that I could afford, I opted to start with a platform that was georeferenced out-of-the-box and build a map with that solution.
 ArcGIS App
Since the ArcGIS App was merely a consumer of GIS content and not an authoring solution, I needed to find a way to create content for it. The natural choice was to peruse the Esri catalog for possibilities. I found a web-based offering called ArcGIS Explorer Online that was capable of producing content that could also be consumed by the ArcGIS App. The stage was set.
Making the dive into ArcGIS is like moving from the minor league team to the majors. It is a whole different environment than what I was accustomed to. It took a few weeks for me to get my bearings with respect to the terms, capabilities, and methods of a true GIS platform. After literally reading a few books I began to create what eventually became the Cajon Pass Chase Map described below.
The Different Way
Being a creative individual, the first point I realized about the Esri solution, at least for the web-based Explorer, was the fact that there is no creative latitude available. One is limited to the base content that Esri makes available through their web services. About the only true custom content available was to upload vector-based data called “shapefiles.”

It became apparent that I must sacrifice creative control for functionality. However, I soon discovered that there are several benefits, over and above what the PDF Maps solution offers, to using the Esri solution:
- Multiple clients available (Desktop browser-based, Apple iOS, Android, Windows 7 Mobile)
- Support for different user-selectable base maps.
- Support for layered content. The user can turn data on or off.
- Since the content is internet-based, I can update the map and the user will get the latest content each time they use the map. No need to re-download a file if the map changes.
The last bullet point also is a con, per se. Since the content is web-based, you cannot use it in an offline capacity. You need internet access to see the map. I figure that since more and more smartphones and tablets are in-use each day, and most are internet-capable, this fact is outweighed by the “current content” concept so I proceeded with the project using the Esri ArcGIS platform.
Eventually I finished my map — at least version .1!
Therefore, Without Further Ado, Allow Me to Introduce…
…my Cajon Pass Chase Map, Version .1.
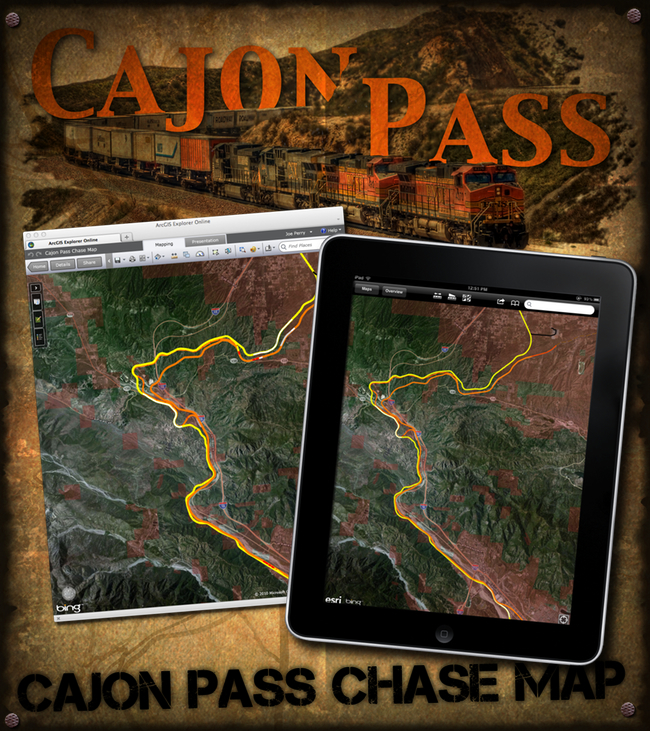
The map can be accessed via a web browser via this link, or via the ArcGIS mobile client by searching for the Cajon Pass Chase Map through the interface. The following images depict the map, running on an Apple iPad, and highlight some of the key features:
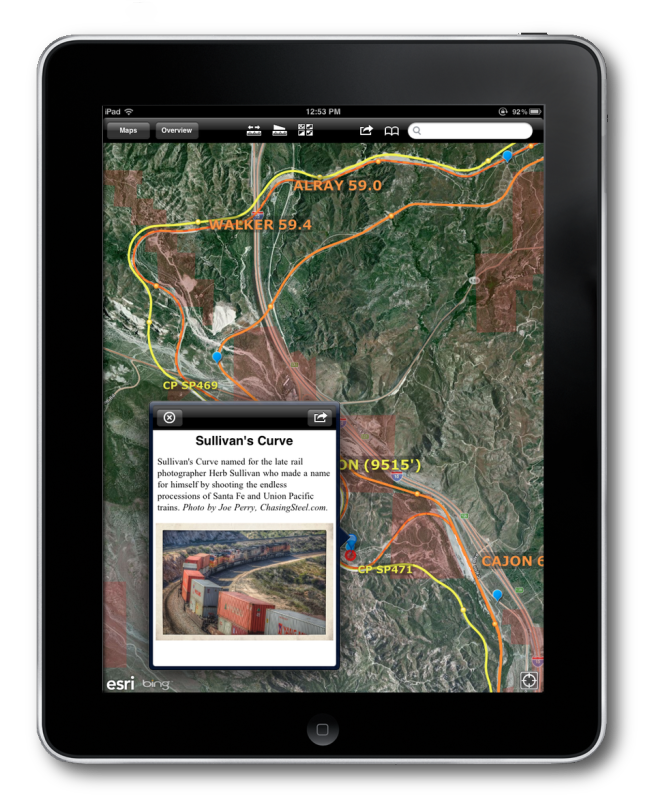 Chasing Steel’s Cajon Pass Chase Map showing one of “Joe’s Map Notes” active.
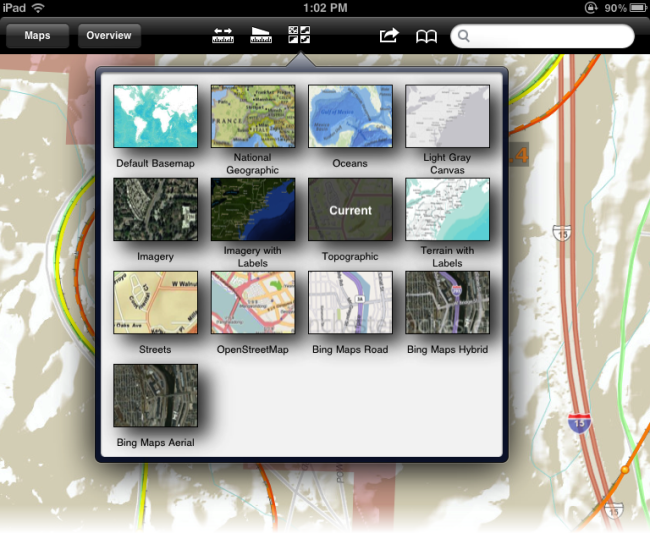 Clicking on the third icon from the left on the toolbar reveals the various basemaps that you can choose to use for the map.
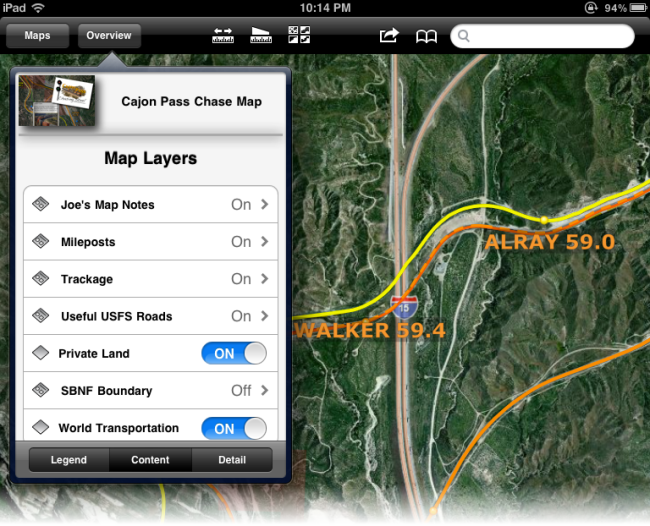 The “Overview” button will call up a dialog box which contains a series of buttons. The “Content” button shows the map’s layers and offers an opportunity to turn on or off layers as desired by the user.
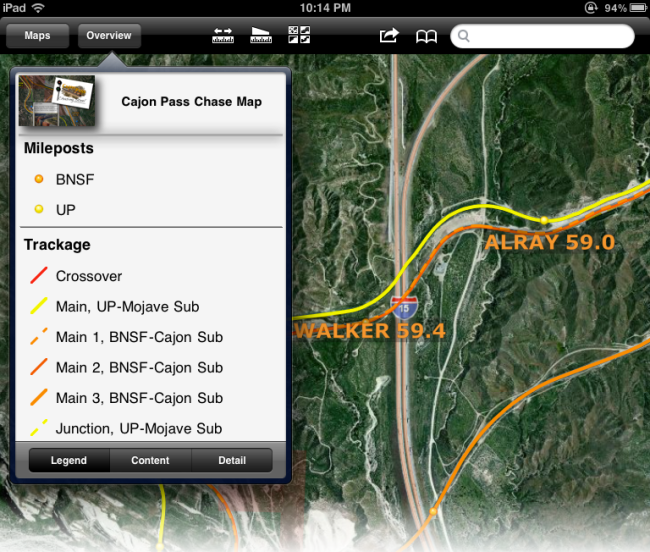 The “Legend” button displays a legend that identifies the various colors and symbols seen on the map.
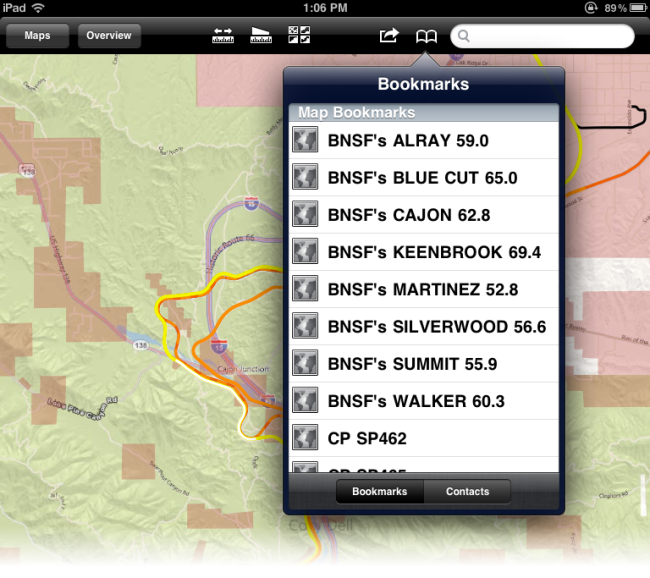 The fifth icon from the left displays the map’s bookmarks. I have pre-loaded some for you.
If This Interests You As Well
 Web GIS: Principles and Applications on Amazon.com
During this exercise I learned a lot about maps, mapping, GIS, and the various software products that are available for both Windows and Mac clients and I have read several books on the topic.
I can highly recommend this book. I have not finished it yet but I can already say that it is money well spent and is well ahead of other books on the subject. It is extremely readable and presents the material in an easy to understand way that is suitable for newbies and geeks alike. It is entitled Web GIS: Principles and Applications by Pinde Fu and Jiulin Sun, ESRI Press, (ISBN-10: 158948245X | ISBN-13: 978-1589482456 | Publication Date: October 15, 2010).
Your Comments and Feedback are Requested
If you have got to this point in this post, then you must have some level of commitment or interest in the topic so i hope you can offer your insight by providing feedback and/or comments to me either regarding my mapping efforts or about GIS in general. My hope is that some GIS pros will read this and can help guide me by providing advice as appropriate. Thank you for your time.
 Projects, Reviews, Technology