random thoughts on railroad photography, railfanning, technology, and such

Entries in HDR (25)

Tuesday
Feb012011

San Timoteo Canyon Steel

A couple of weeks ago I was able to venture out and chase steel for a few hours. After careful consideration, I opted to head towards Union Pacific’s Yuma Subdivision. In particular, I headed for the western edge of the subdivision which traverses the San Timoteo Canyon and constitutes the western slope of the formidable Beaumont Hill. While the traffic levels aren’t as high as one might find on the BNSF’s Cajon Subdivision, the area is extremely accessible and offers some great scenery and sweeping curves.

I arrived shortly after sunrise and picked a spot that seemed promising. I waited for a bit and then I heard a hotbox detector announcement on the radio that indicated a westbound would be passing my location shortly. Sure enough, I heard the horn blowing for the road crossings east of me.

Once the train arrived on scene I snapped the following images:

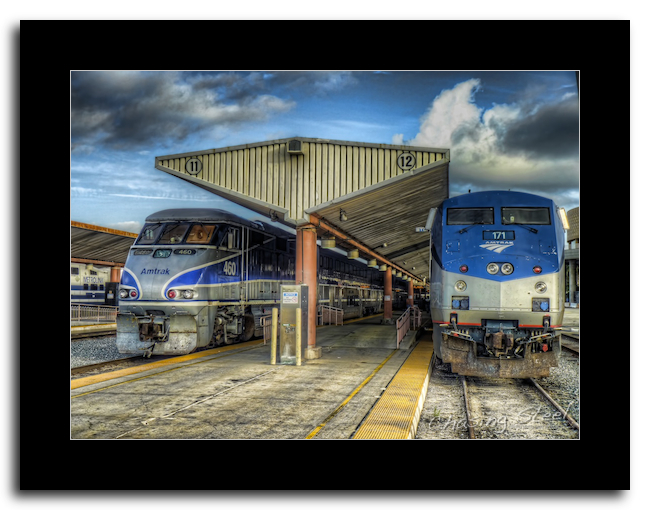
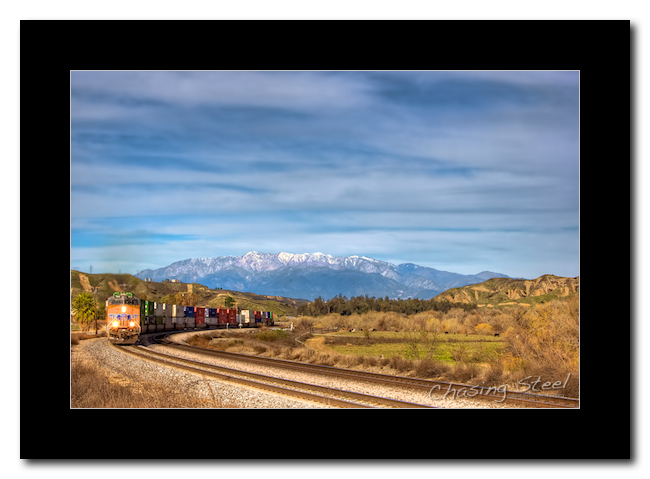
UP 9667 West at El Casco, CA 1 - UP 9667 (GE C44-9W) leads a trio of EMD SD70Ms; 3901, 3893, and 4965, on the point of an early morning doublestack consist with 200+ COFC/TOFC loads at El Casco, CA. [1/16/2011 - Yuma Subdivision] © Copyright 2011, Joe Perry

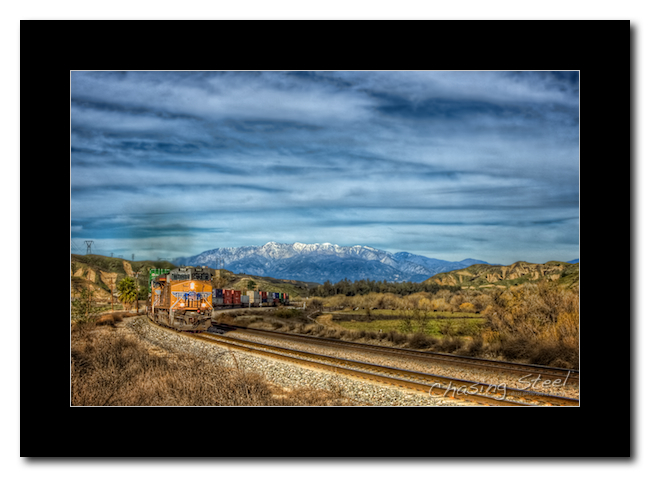
UP 9667 West at El Casco, CA 2 - UP 9667 (GE C44-9W) leads a trio of EMD SD70Ms; 3901, 3893, and 4965, on the point of an early morning doublestack consist with 200+ COFC/TOFC loads at El Casco, CA. [1/16/2011 - Yuma Subdivision] © Copyright 2011, Joe Perry About ten minutes later an eastbound could be heard approaching through the trees west of my location. After a five minute wait the train appeared and I took these two shots:

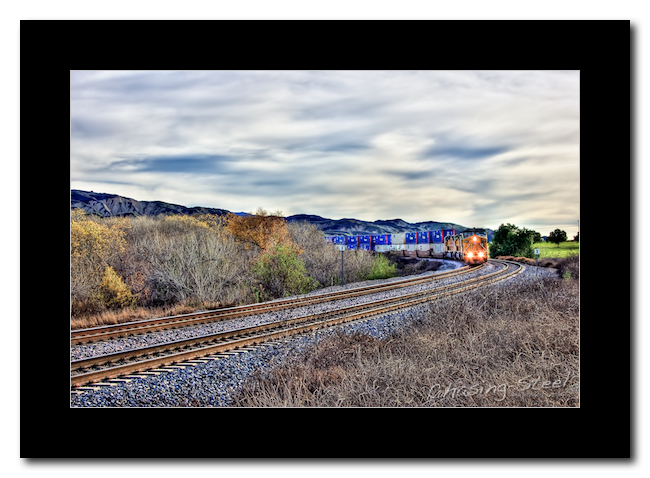
UP 7812 East 1 - UP 7812 (GE ES44AC) and UP 4909 (EMD SD70M) provide the head-end power for this eastbound intermodal with UP 8658 (EMD SD70ACe) handling the DPU duty on the rear-end as this eastbound handles the curves of the western Yuma Subdivision at El Casco, CA. [1/16/2011 - Yuma Subdivision] © Copyright 2011, Joe Perry

UP 7812 East 2 - UP 7812 (GE ES44AC) and UP 4909 (EMD SD70M) provide the head-end power for this eastbound intermodal with UP 8658 (EMD SD70ACe) handling the DPU duty on the rear-end as this eastbound handles the curves of the western Yuma Subdivision at El Casco, CA. [1/16/2011 - Yuma Subdivision] © Copyright 2011, Joe Perry

At this point the traffic dried up a bit and I didn’t want to wear out my welcome, since I was parked on the side of the road, so I followed the rails east. I made it all the way to Palm Springs without seeing, or hearing, another train. (Later I learned that a train had experienced an emergency condition that caused the train to stop on the main and tied up traffic. I never learned the caused the stoppage.)

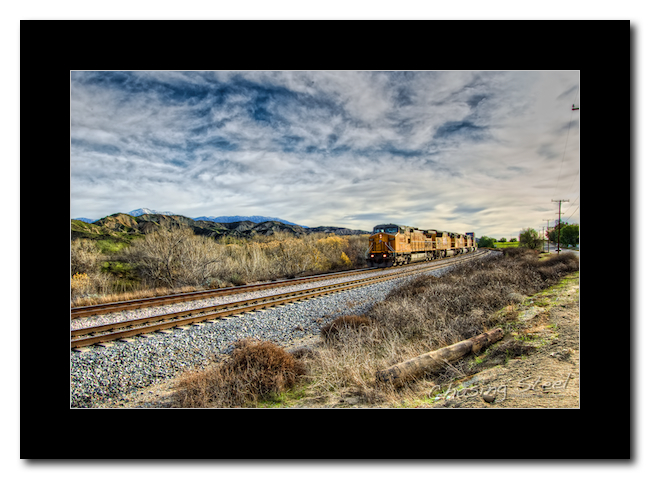
I decided to call it a day and head home. On my trip home  I did catch this empty eastbound vehicle train near Cabazon after the stoppage cleared and it became my favorite photo of the day:

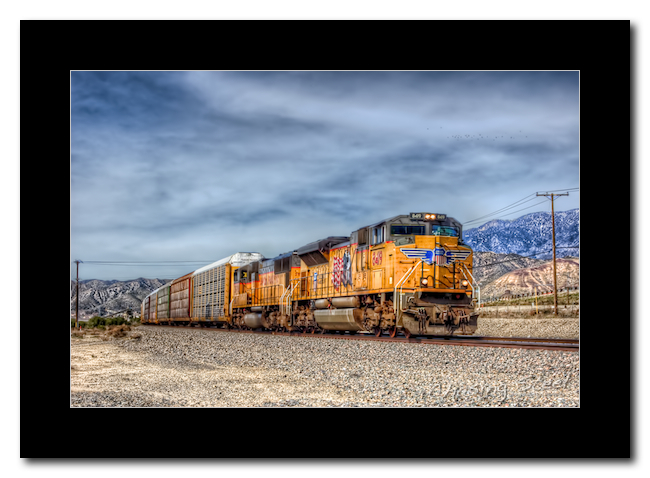
UP 8419 East - UP 8419 (EMD SD70ACe) and UP 3978 (EMD SD70M) are the only units assigned to hustle this empty vehicle train east - seen here near Cabazon, CA. [1/16/2011 - Yuma Subdivision] © Copyright 2011, Joe Perry

Thursday
Jan132011

Amtrak Dual - Variations of a Photo

As I stated in my previous post, HDR Photography Visually Explained, here is a post showcasing an HDR photo which has been processed with different effects. I was trying out different techniques to sharpen my skills and different styles to see what appeals to me.

The original photo, shown below, was taken as a series of 7 exposures and then combined into an HDR photo with HDRsoft’s Photomatix Pro. I like the photo very much. I feel it conveys the scene accurately and it is sufficiently detailed. (You can click on the photos to see a larger version.)

Amtrak Dual 1 - Variations of a photo number 1 - Original HDR photo. AMTK 460 (EMD F59PHI) and AMTK 161 (GE P42DC) are the power for their respective trains sitting idle at Los Angeles Union Station. [11/26/2011 - River Subdivision] © Copyright 2011, Joe Perry

As I looked at the photo I thought the clouds lent themselves very well to a monochromatic treatment to I converted the image to a dark sepia version.

Amtrak Dual 2 - Variations of a photo number 2 - Dark sepia overall. [11/26/2011 - River Subdivision] © Copyright 2011, Joe Perry

I am really fond of a lighter sepia treatment and some vignetting but I think in this case it doesn’t work well because the image is cropped too close on the right side to make this look work.

Amtrak Dual 3 - Variations of a photo number 3 - Light sepia overall. [11/26/2011 - River Subdivision] © Copyright 2011, Joe Perry

Back to the darker image, I wanted to emphasis the trains a little more so I gave them a light colorization - which is one of Deb’s favorite looks.

Amtrak Dual 4 - Variations of a photo number 4 - Dark sepia overall and lightly colorized trains. [11/26/2011 - River Subdivision] © Copyright 2011, Joe Perry

Finally, back to the lighter sepia version, I applied a heavy colorizing treatment to the trains without regard for the vignette and even applied a drop shadow to the trains themselves to make them “pop” off the page.
Amtrak Dual 5 - Variations of a photo number 5 - Light sepia overall and colorized trains. [11/26/2011 - River Subdivision] © Copyright 2011, Joe Perry

I like photos #1 and #4 the best.  Which photo(s) appeal to you?

Sunday
Dec192010

HDR Photography Visually Explained

I am often asked how I captured the details when I show someone my photography. The comment that their “photos don’t look like that.”  I then explain the process of capturing the details, through proper exposure, and the benefits of High Dynamic Range (HDR) photography.  I though it might help to produce a post that visually details how to capture a scene in HDR an show that everyone can do it.

The only requirements are a camera capable of shooting in aperture-priority mode - typically the big “A” on the dial, and software that can put the final images together. Most consumer-grade cameras today can shoot exposures that will work with HDR and it makes it even easier if the camera also does auto-bracketing. The first step of the process is to actually read the manual that came with your camera and learn about aperture-priority mode, exposure controls for your camera, and auto-bracketing.

Here is an example of why and how to do HDR photography:

I was passing through Los Angeles Union Station one day during my commute to work and decided to shoot a scene that had two Amtrak trains posed side-by-side on tracks 11 and 12.  The scene offered plenty of detail, variation in light, and most importantly to me, a storm-clad sky. If I shot the scene in a traditional manner of photography, I would have to make a comprise between all of these elements and not be able to capture the scene as it truly was. If I exposed for the sky then the train’s consist in the shadow of the platform would not have been properly exposed and vice-versa. This is where HDR comes through for us.

Here is the way the scene looked with a single photo taken with the camera’s automatic exposure setting:

Now this shot has not been post-processed and represents how the photo came out of the camera. In my opinion, all digital photos require some post-processing to enhance the photo and “bring it to life,” so to speak. The following shows the photo after some color-correction, contrast adjustments, and sharpening has been applied to the photo:

P1070943 after post-processing.jpg

This photo is OK but nothing too spectacular and certainly it is not representative of the scene. So let’s shoot it in HDR. It is easy to do!

I set my camera on aperture-priority mode and turn on the auto bracketing feature. Now when I press the shutter button the camera takes 3 exposures (photos) each one exposure setting apart (f-stop). I take the first three shots and then adjust the camera to span those shots and shoot one more set and then adjust the exposure again and shoot the final three shots. In the end, I have taken nine total pictures of the scene, with seven of them set at different exposure settings.

Here’s what the photos look like side-by-side:

Now we have photos that are properly exposed for the sky and the shadow detail as well. The trick is to combine these photos into one image without comprising any of the exposure information. This is where we need some specialized software to handle this task.

I am familiar with many of the HDR titles available for this purpose but the two I choose to use are HDRsoft’s Photomatix Pro ($99) and Nik Software’s HDR Efex Pro ($159.95). You only need one to create HDR images and I would recommend Photomatix Pro for most folks initially.

To create the final HDR image you identify all of the photos that contain the different exposure settings and the software does the heavy lifting by combining all of the exposure information into a final image. Once you have the final image you can then tweak the settings to get the look that you are going for. That’s it.

Here is the final image after some tweaking, while keeping it on the more realistic side:

Much better! Note how the sky pops and yet we are still able to see the shadowed consist on track 11 without issue. notice how it looks more like what you would see if you were there with me.

Some people feel that the HDR images look unnatural. Well, that is true for a photo in the traditional sense, but look at it not as a photo but rather a scene. You eye’s can adjust to the different exposures without even thinking about it as you take a scene in in-person. This is what an HDR image shows but in a static context.

Now I admit that there are some challenges in learning how to fully leverage the HDR software and learning all of the various settings available. Fortunately several excellent tutorials are available to help you wrap your arms around the process. For Photomatix Pro, I recommend that you check out Ferrell McCollough’s blog “Before the Coffee” for an excellent tutorial. Of course be sure to also consume Trey Ratcliff’s excellent material on HDR as well on his “Stuck In Customs” blog. For HDR Efex Pro I recommend Jean-FrancoisO’Kane’s, The Studio Coach, tutorial series and John Barclay’s videos on the Nik Software video on demand site.

I hope that you can see that HDR photography is not that hard and it adds quite a bit to your photos, and it can be a lot of fun! In a following post I will show various examples of this same image processed with different effects.