random thoughts on railroad photography, railfanning, technology, and such

Entries in Technology (24)

Monday
Oct102011

Changing the World

I was on my way home via an eastbound Metrolink commuter train out of Los Angeles when I, like others, received a pop-up notification on my iPhone from a national news source that delivered the terrible news. The notification read, “Apple reports Steve Jobs has died.

I was stunned and shocked. I was seated on the floor of the trains “quiet car,” I boarded too late to get a seat, and I took a look around to see if other’s had received a similar message. Most of my fellow passengers were reading a book or already fast asleep, although there were a few others busily burying their faces in their mobile devices. I surfed the web for confirmation and quickly received it. I was devastated. I sent a text to my closest friends and a “tweet” as tears filled my eyes.

I got home in a somber mood and spent some time reading myriads of news stories, posts, and tributes late into the night. I was drawn to the reason I was so moved by Steve Jobs’ passing. Obviously, part was to do the fact that someone I was familiar with had died. But now, after several days of introspective reflection, I realize that Steve Jobs was someone I admired immensely.

For long time readers of my blog, you may recall that I have only recently become a fan of Apple products. I work professionally in the technology industry and for nearly 25 years now I have worked with Microsoft-based solutions primarily. It was only after purchasing an iMac computer for our home use that I began to appreciate the zen of Apple — and the masterful vision, leadership ability, and the intense level of commitment of Steve Jobs.

As my ownership of Apple products increased in number so did my use of Apple products on a day-to-day basis. I began to develop a deep sense of appreciation, and connection, with Apple and Steve Jobs. As anyone who owns an Apple product will tell you, there is something very appealing about being an “Apple user.” It begins with the unboxing process. As I unboxed our new iMac back in 2009, I thought, “with so much consideration given to something as simple and fleeting as unboxing a product, the rest of the experience is going to be amazing!” And it is, with all Apple products.

Much has been written about the successes, and failures, of Apple over the years, and a simple search of the internet will reveal a ton of content on the PC vs. Mac debate, so I won’t go into it here, but suffice it to say — I am proud to be a Mac!

Through my appreciation of Apple and Steve Jobs, I began to read books regarding both and researched the “Steve Jobs story.” Suffice it to say that I would not be mistaken in saying that Steve Jobs was truly one-of-a-kind in our era. He was a prolific visionary, the best CEO of our time, and an amazing innovator. His talents will be unrivaled, unfortunately, for some time to come.

Over the course of the next few months there are sure to be many stories and television specials about his life and the contributions he has made for the betterment of all and I encourage everyone to watch or read them because Steve Jobs was truly unique and an amazing individual that had a far reaching impact on us all. There is much that we can learn from his story, struggles, and triumphs. For the uninitiated, and a little insight into what I mean, here is a video of Steve Jobs delivering a commencement address before the graduating class of Stanford University in 2005:


In my discussions about Apple and Steve Jobs to many in the last few years, you can tell those who “get it” and know exactly how you feel and/or what you mean from those who don’t. I think to “get it” you have to really use an Apple product and then you will see that Steve “got us” from the very beginning.

Steve, I get it and you will be missed.

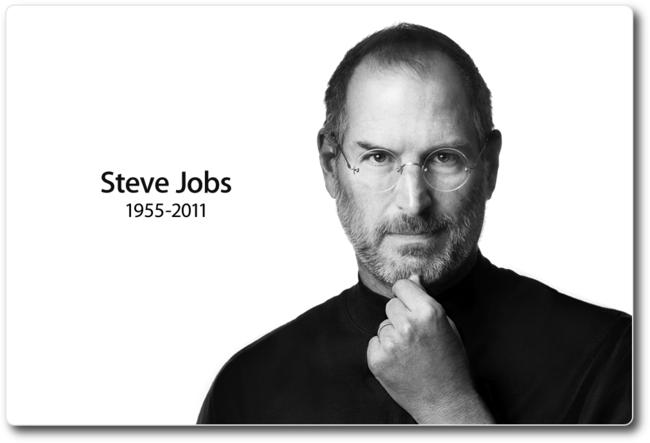
Image of Apple Inc.’s web site honoring Steve Jobs. (Photo courtesy of Apple Inc.)

“Here’s to the crazy ones, the misfits, the rebels, the troublemakers, the round pegs in the square holes… the ones who see things differently — they’re not fond of rules… You can quote them, disagree with them, glorify or vilify them, but the only thing you can’t do is ignore them because they change things… they push the human race forward, and while some may see them as the crazy ones, we see genius, because the ones who are crazy enough to think that they can change the world, are the ones who do.” – Steve Jobs


And for those, like me, looking for a little levity…


Tuesday
May242011

Our Best Trip Ever - Part 1 - The Planning

It had been just under five years since Deb and I ventured east to one of our favorite locations in the west, the La Posada Hotel in Winslow, Arizona, and BNSF’s Seligman Subdivision. After completing a major project at work, I felt the need to take a respite so, in early April, Deb and I made plans to head east.

After garnering the necessary approvals for my vacation time at work, I set about to planning the trip. Ask anyone who knows me and they will tell you that I am, more often than not, meticulous in preparing for a trip. I like to research shooting locations, points of interest, accommodations, and the like so that I can optimize our time spent in the field photographing trains and ensure that we have a good time.

Considering the stress level I was under at work, and Deb’s need for some time away from it all, I concluded that we should take a few days to chill and get grounded once again before we set about chasing steel. The perfect place to do just that was at the La Posada Hotel. We would make the La Posada destination number one.

Having been to the La Posada before, I was versed in the ample opportunities for photography that the location afforded us. I didn’t need to “research” that aspect of the trip. We had also shot photos of the Seligman Sub in years past but we didn’t have our truck and camper, like we do now, which allows us tremendous freedom - both in access and self-sufficiency. We were free to camp literally anywhere. As such, I wanted to find some of the more picturesque and remote locations that we missed on previous trips.

I turned to the almighty Google to assist in the research effort. One of the sites that Google returned in my search results was Brett Wirick’s excellent “BNSF’s Seligman Subdivision” site. Brett’s treatment of the Seligman Sub was invaluable and served as the basis for laying out the locations that I wanted to visit and describing the routes to get there. Another great site on the subject was Jon Adam’s BNSF Southwest Division Seligman Subdivision site. (Thanks for the ATCS info Jon!)

Armed with all the research data and possible shooting locations in mind I began to layout our trip. I looked for a map that would fulfill my needs and didn’t find one that I felt was suitable and portable enough. I wanted a planning map showing the entire route with notations of all of the possible campsites and key points along the way. Being a licensed amateur radio operator, I also wanted to note all of the key radio frequencies that might be handy during our venture. (I like to be informed.)

After scouring the web, I decided to purchase a Mac mapping application called Ortelius, from Mapdiva, LLC. I took some time to learn the nuances of the application, and of cartography in general, and created a couple of maps for our journey. The first one I created was the overview map with all of the relevant details for our trip clearly noted:

Our “Planning Map” showing key locations and address info, radio frequencies, and our tentative schedule and plan.

The next map I created was a detailed map of the Crookton Cut-Off which was a special portion of BNSF’s Seligman Subdivision that we were going to focus on:

BNSF’s Crookton Cut-Off - A detailed map I made complete with control point locations, milepost markers, and potential access points.

The beauty of this mapping solution was that I now had a custom map that held all of the information in one location and could be quickly referred to using one of our iPads. To accomplish that I exported the maps as Adobe PDF files and transferred them to the iPad. I quickly found out that the native iBooks application was rather slow at rendering the large files. I searched for a solution and found a great application from Avenza Systems, Inc. called, appropriately enough, “PDF Maps.” This application pre-renders the maps, which increases their storage size on your device, but the trade-off is lightning fast rendering of the maps. Perfect, just what I wanted. Oh, did I mention that it is also free?

Now that we had planned our trip we made reservations for a two-nights stay at the glorious La Posada Hotel in Winslow, Arizona. We were still about two weeks out at this point and I couldn’t wait for the trip to begin. I prepared our truck in the intertrim and waited like a kid in line at a bathroom. “I wanted go!”

(Over the course of the next few posts I will recount our trip and share some of the 6,500 some odd photos that we took. It was a great trip!)

Sunday
Dec192010

HDR Photography Visually Explained

I am often asked how I captured the details when I show someone my photography. The comment that their “photos don’t look like that.”  I then explain the process of capturing the details, through proper exposure, and the benefits of High Dynamic Range (HDR) photography.  I though it might help to produce a post that visually details how to capture a scene in HDR an show that everyone can do it.

The only requirements are a camera capable of shooting in aperture-priority mode - typically the big “A” on the dial, and software that can put the final images together. Most consumer-grade cameras today can shoot exposures that will work with HDR and it makes it even easier if the camera also does auto-bracketing. The first step of the process is to actually read the manual that came with your camera and learn about aperture-priority mode, exposure controls for your camera, and auto-bracketing.

Here is an example of why and how to do HDR photography:

I was passing through Los Angeles Union Station one day during my commute to work and decided to shoot a scene that had two Amtrak trains posed side-by-side on tracks 11 and 12.  The scene offered plenty of detail, variation in light, and most importantly to me, a storm-clad sky. If I shot the scene in a traditional manner of photography, I would have to make a comprise between all of these elements and not be able to capture the scene as it truly was. If I exposed for the sky then the train’s consist in the shadow of the platform would not have been properly exposed and vice-versa. This is where HDR comes through for us.

Here is the way the scene looked with a single photo taken with the camera’s automatic exposure setting:

Now this shot has not been post-processed and represents how the photo came out of the camera. In my opinion, all digital photos require some post-processing to enhance the photo and “bring it to life,” so to speak. The following shows the photo after some color-correction, contrast adjustments, and sharpening has been applied to the photo:

P1070943 after post-processing.jpg

This photo is OK but nothing too spectacular and certainly it is not representative of the scene. So let’s shoot it in HDR. It is easy to do!

I set my camera on aperture-priority mode and turn on the auto bracketing feature. Now when I press the shutter button the camera takes 3 exposures (photos) each one exposure setting apart (f-stop). I take the first three shots and then adjust the camera to span those shots and shoot one more set and then adjust the exposure again and shoot the final three shots. In the end, I have taken nine total pictures of the scene, with seven of them set at different exposure settings.

Here’s what the photos look like side-by-side:

Now we have photos that are properly exposed for the sky and the shadow detail as well. The trick is to combine these photos into one image without comprising any of the exposure information. This is where we need some specialized software to handle this task.

I am familiar with many of the HDR titles available for this purpose but the two I choose to use are HDRsoft’s Photomatix Pro ($99) and Nik Software’s HDR Efex Pro ($159.95). You only need one to create HDR images and I would recommend Photomatix Pro for most folks initially.

To create the final HDR image you identify all of the photos that contain the different exposure settings and the software does the heavy lifting by combining all of the exposure information into a final image. Once you have the final image you can then tweak the settings to get the look that you are going for. That’s it.

Here is the final image after some tweaking, while keeping it on the more realistic side:

Much better! Note how the sky pops and yet we are still able to see the shadowed consist on track 11 without issue. notice how it looks more like what you would see if you were there with me.

Some people feel that the HDR images look unnatural. Well, that is true for a photo in the traditional sense, but look at it not as a photo but rather a scene. You eye’s can adjust to the different exposures without even thinking about it as you take a scene in in-person. This is what an HDR image shows but in a static context.

Now I admit that there are some challenges in learning how to fully leverage the HDR software and learning all of the various settings available. Fortunately several excellent tutorials are available to help you wrap your arms around the process. For Photomatix Pro, I recommend that you check out Ferrell McCollough’s blog “Before the Coffee” for an excellent tutorial. Of course be sure to also consume Trey Ratcliff’s excellent material on HDR as well on his “Stuck In Customs” blog. For HDR Efex Pro I recommend Jean-FrancoisO’Kane’s, The Studio Coach, tutorial series and John Barclay’s videos on the Nik Software video on demand site.

I hope that you can see that HDR photography is not that hard and it adds quite a bit to your photos, and it can be a lot of fun! In a following post I will show various examples of this same image processed with different effects.